Disney DIY- Alice in Wonderland Table

I am a big Alice in Wonderland Fan. I love the colors and the adventure in the story. Recently, someone had given us two solid wood doors but we didn’t have a use for them so my husband was going to put them out by the road. I half-jokingly said, “keep one, we can make a table out of it!” After talking about it, we decided to go for it and make a Disney DIY Alice in Wonderland table for our patio.
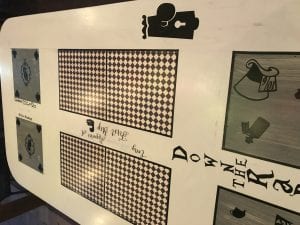
The door is a solid oak door. We painted it white and then bought some boards to fill in sections of the door. We wanted to keep it simple so we decided to go with gray at the ends and white everywhere else.

Cricut DIY Disney’s Alice in Wonderland
I used my Cricut to help me with the DIY Alice in Wonderland pieces and cut out outdoor vinyl shapes to decorate the door with. I found some great Alice in Wonderland .svg files and converted a few of my own also.
The table would not have been possible to do I don’t think without the Cricut. The Cricut Design Space lets you not only upload .svg files but also lets you upload and edit your own files as well. This is what really made me upgrade from my Cricut Expressions to the Cricut Explore Air. I have the Wild Orchid one and love it.


We used Modge Podge to put some paper down on the two middle boards and in the center have a quote

We used a holographic vinyl for some of the words to “highlight” them. Although they look light in the picture, they actually show up great- especially when the sun hits it. They shimmer nicely when the light hits.
To hang over the table, we created a frame with flowers hanging down from it. We got the idea from walking inside a Kuhn flower shop where they had a display. It consists of a wood frame, adding wiring in it, and then some artificial flowers from Michaels. Then we added some colored patio bulb lights that hang around the side of the frame.
Alice in Wonderland DIY Table Nighttime View

Another nighttime view from the opposite angle

My Mickey Swirl at the end of the Down The Rabbit Hole Quote shows up great in the picture above. I wanted to add in a “hidden Mickey” of sorts as an added homage to our Disney love. It’s becoming a thing at our house to find hidden Mickeys.


It turned out great and was a lot of fun to get creative with. I let the kids help decide which images we should use and they even helped with applying them. The application part was a little more tricky for them, but we stuck with the simple pieces, like the teapots.
To finish it off, we made a template of the door to have glass cut so that it will be covered. We also purchased an outdoor table cover to keep it out of the weather when it’s not being used.
It didn’t take long at all to get the whole project done. I’m so glad we decided not to throw it out. Next, I want to throw an Alice Tea Party! I have some decorations leftover from our Alice Babyshower that can completely be reused for a party.
Have you ever used an old door to make something different out of it like a table?
These tools are SO helpful!! I’ve tried to do the weed the vinyl that I cut with my Cricut without them and it’s a huge hassle and sometimes absolute fail.

More Disney DIY

Leave a Reply